What Are Whitening Trays
Whitening trays, also known as bleaching trays, are custom-made or pre-fabricated devices designed to hold a whitening solution against the surface of your teeth. They are a popular method for achieving a brighter smile at home or under the guidance of a dental professional. These trays are an effective way to combat discoloration caused by factors such as coffee, tea, smoking, and aging. By delivering a whitening agent directly to the teeth, whitening trays offer a convenient and often more affordable alternative to in-office whitening procedures. The trays ensure that the whitening agent, typically containing hydrogen peroxide or carbamide peroxide, makes consistent contact with the teeth, maximizing its effectiveness.
Types of Whitening Trays Available
There are several types of whitening trays available, each catering to different needs and preferences. Understanding the various options can help you choose the most suitable method for achieving your desired results. The primary distinction lies in whether the trays are custom-made by a dentist or purchased over-the-counter. Both options offer the potential for a brighter smile, but they differ significantly in terms of cost, fit, and the level of professional guidance provided. The choice often depends on individual dental needs, budget considerations, and the degree of whitening desired. Consulting with a dentist can provide personalized recommendations based on your specific oral health condition and aesthetic goals.
Custom Whitening Trays

Custom whitening trays are tailored to fit your teeth perfectly. A dentist takes an impression of your teeth and sends it to a dental lab, where the trays are fabricated to match your unique dental structure. This personalized fit ensures the whitening gel makes optimal contact with your teeth, preventing the leakage of the solution onto your gums, which can cause sensitivity. They are typically more expensive but offer greater comfort and effectiveness. They are an ideal choice for those seeking a professional and precise whitening experience. The custom fit maximizes the whitening results and reduces the risk of potential side effects. The process generally involves several visits to the dentist’s office, ensuring a precise and comfortable whitening experience.
Pre-filled Whitening Trays
Pre-filled whitening trays are a convenient over-the-counter option, readily available in many drugstores and online. These trays come pre-loaded with a whitening gel, simplifying the whitening process. They are designed to be disposable, making them easy to use without the need for a dental visit. However, these trays are generally less effective than custom trays due to a less precise fit, which can lead to uneven whitening and potential gum irritation. The pre-filled trays offer a quicker solution for those seeking a brighter smile. It’s important to follow the instructions carefully to minimize the risk of any adverse effects. The convenience of pre-filled trays makes them a popular choice for those looking for a quick and easy whitening solution.
How Whitening Trays Work Step 1
The journey to a brighter smile with whitening trays begins with a critical first step: the impression. If you opt for custom trays, the dentist will take an impression of your teeth using a dental mold and impression material. This mold is then sent to a dental lab where technicians use it to create custom trays that perfectly fit your mouth. The precision of this impression is crucial, as it ensures the tray fits snugly and delivers the whitening agent evenly across your teeth. The first step may seem simple, but it sets the foundation for an effective and comfortable whitening process. Proper preparation is key to the success of your whitening efforts.
Making the Impression

Making the impression is an essential part of the process, particularly for custom whitening trays. The dentist will use a tray filled with a soft, moldable material, such as alginate or digital scanners, to capture the precise shape of your teeth. This material hardens around your teeth, creating a negative imprint. The accuracy of the impression determines the fit of the whitening tray. A well-made impression ensures a comfortable and effective whitening experience. This step might involve a slight gagging sensation for some individuals, but the overall process is generally quick and painless. Following the impression process, the mold is used to create the custom whitening tray designed specifically for your mouth.
How Whitening Trays Work Step 2
The second step in the whitening tray process involves the fabrication of the tray itself. Once the impression is made, either at the dentist’s office or a dental lab, the creation of the tray begins. The dental lab uses the impression to create a model of your teeth, which is then used to form the custom-fitted whitening trays. This fabrication process ensures that each tray fits precisely and comfortably. This custom fit is essential for maximizing the effectiveness of the whitening agent. The better the tray fits, the less likely the gel is to leak, which helps to reduce potential side effects such as gum irritation. The precision of the tray fabrication plays a crucial role in the success of the whitening process.
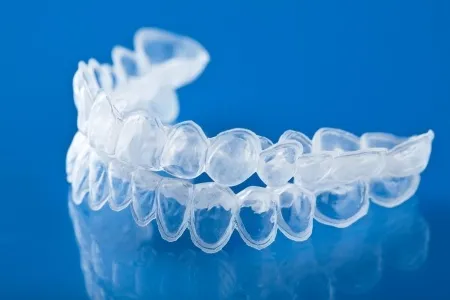
The Tray Fabrication
The tray fabrication involves skilled technicians who use the dental impression to create a custom-fitted tray. This process often involves creating a model of your teeth based on the impression. The trays are made from a thin, transparent plastic material, ensuring that they are comfortable to wear and allow you to see the whitening gel on your teeth. The precise fit minimizes any potential for the whitening gel to leak onto your gums, reducing the chances of sensitivity. The fabrication process is carefully controlled to guarantee the effectiveness and safety of the whitening process. Properly fabricated trays are an essential component for a successful teeth-whitening experience.
How Whitening Trays Work Step 3

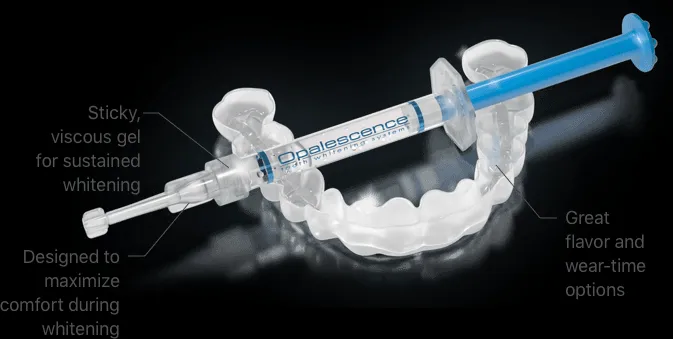
The whitening process with trays revolves around the application of a bleaching agent. Typically, a whitening gel containing hydrogen peroxide or carbamide peroxide is used. These chemicals break down stains and discoloration on the teeth. The bleaching agent is applied to the inside of the tray. The tray is then placed over the teeth. Once the tray is in place, the whitening gel is held in close contact with the tooth surfaces, allowing it to effectively penetrate the enamel and remove stains. The length of time the tray needs to be worn, and the concentration of the whitening agent, depend on the specific product used. It’s important to carefully follow the instructions given by your dentist or the manufacturer.
The Whitening Process
The whitening process involves a chemical reaction that lightens the color of the teeth. The whitening agent, such as hydrogen peroxide, penetrates the enamel and breaks down the stain molecules. This process makes the teeth appear whiter. The effectiveness of the whitening process depends on several factors, including the concentration of the bleaching agent and the duration of treatment. It’s crucial to adhere to the recommended treatment time and dosage to achieve the desired results. Regular dental check-ups help ensure that the whitening treatment is safe and effective. Following the instructions carefully is key for achieving the best outcomes from the whitening process.
How Whitening Trays Work Step 4
This step focuses on the direct application of the whitening gel into the custom or pre-filled trays. The process begins with carefully applying the gel to the tray, ensuring an even distribution. Once the gel is in place, the tray is gently placed over the teeth, making sure it fits snugly. This application method ensures that the whitening agent is in direct contact with the teeth’s surface, allowing it to effectively work on removing stains and discoloration. Proper application is crucial for achieving consistent and effective whitening results. This step is straightforward, but it’s important to follow the instructions for the best outcome.
Application of Whitening Gel
Applying the whitening gel is a crucial part of the process. You should apply the gel evenly inside the tray, ensuring enough to cover the surface of your teeth. Excessive amounts of gel can lead to leakage and potential gum irritation, while too little may reduce the effectiveness. The amount of gel needed depends on the tray design and the instructions provided. Following the application, carefully place the tray onto your teeth. Always follow the specific instructions provided with your whitening kit or by your dentist. Proper application of the whitening gel enhances the results.
How Whitening Trays Work Step 5
The final step in using whitening trays focuses on maintaining the results. After the recommended treatment time, the trays should be removed. Rinse your mouth and brush your teeth gently to remove any remaining gel. It is also important to rinse and clean your trays thoroughly. This helps ensure they are ready for the next treatment. By adopting a consistent oral hygiene routine, you can help maintain the results achieved with the whitening trays. This includes regular brushing and flossing. Avoiding foods and drinks that stain your teeth can also prolong the whitening effects. Regular dental check-ups and cleanings are essential for preserving a bright and healthy smile.
Maintaining Your Results
Maintaining the results from whitening trays involves consistent care and attention. This includes avoiding stain-causing foods and drinks such as coffee, tea, red wine, and dark-colored berries. Regular brushing and flossing are essential to remove plaque and prevent new stains. Consider using a whitening toothpaste to help maintain the brightness of your teeth. Regular dental check-ups and professional cleanings are also crucial for preserving your bright smile. Following these simple steps helps you keep your teeth looking their whitest. With proper care, you can enjoy long-lasting results.
How Long Do Whitening Trays Take to Work

The timeframe for seeing results with whitening trays varies depending on the individual, the type of whitening product used, and the severity of the staining. With custom trays and professional-strength whitening gel, visible results can often be seen within a few days to a couple of weeks. Over-the-counter trays may take longer, sometimes several weeks, to show noticeable changes. The consistency of your treatment and adherence to the instructions are also key factors. Results also differ from person to person. Consulting a dentist helps set realistic expectations and determine the optimal whitening treatment duration. Be patient, as noticeable whitening typically develops over time with consistent use.
Factors Affecting Whitening Results
Several factors can influence the effectiveness of whitening trays. The type of staining on your teeth, whether it’s caused by food, beverages, or other factors, plays a significant role. The concentration of the whitening agent in the gel is another key factor. The duration and frequency of the treatment also affect results. Individual tooth enamel characteristics vary, and some teeth may whiten more easily than others. The consistency of your treatment schedule is essential for optimal results. Your overall oral health condition also contributes, as healthy teeth respond better to whitening treatments. Consulting with a dentist can help address specific factors and provide personalized recommendations to enhance the effectiveness of the whitening process.
Professional Whitening Trays vs. Over-the-Counter
The choice between professional and over-the-counter (OTC) whitening trays depends on your specific needs, preferences, and oral health. Professional trays, custom-made by a dentist, offer a precise fit and often use stronger whitening agents, leading to more effective results. OTC trays are readily available and more affordable, but they may not fit as well and may contain lower concentrations of whitening agents. If you have sensitive teeth, custom trays are generally recommended to prevent irritation. Professional whitening offers greater control and guidance, while OTC options provide convenience and accessibility. Consulting with a dentist will help you determine the best option based on your individual needs and goals. Considering all factors, from cost to effectiveness, helps you select the most suitable method for achieving a brighter smile.
Advantages of Professional Trays

Professional whitening trays provide several advantages over OTC options. The custom fit ensures the whitening gel is applied evenly and minimizes the risk of gum irritation. Dentists can use stronger whitening agents, leading to faster and more dramatic results. Professional trays come with expert guidance, allowing the dentist to monitor your progress and adjust the treatment as needed. They can address any potential issues, such as tooth sensitivity, and recommend appropriate solutions. With professional trays, you receive comprehensive care and support throughout the whitening process. Professional supervision also ensures that the whitening treatment is safe and effective. Investing in professional whitening trays often provides better outcomes and a more comfortable experience.
Potential Side Effects of Whitening Trays
While whitening trays are generally safe, some potential side effects can occur. Tooth sensitivity is one of the most common, especially during the initial stages of treatment. Gum irritation is another possibility, often due to the whitening gel coming into contact with the gums. In rare cases, individuals may experience discomfort in their temporomandibular joint (TMJ). Following the instructions provided, and consulting with a dentist, can help minimize these side effects. They may recommend desensitizing toothpaste or adjusting the treatment plan. Being aware of these potential issues will help you prepare for and manage them effectively. Most side effects are temporary and resolve once the treatment is complete.
Managing Tooth Sensitivity
Tooth sensitivity is a common side effect of teeth whitening, but several methods can help manage it. Using a desensitizing toothpaste containing potassium nitrate can help block the nerve endings in your teeth, reducing sensitivity. Applying the whitening gel less frequently or for a shorter duration can also reduce sensitivity. Your dentist might recommend using a fluoride treatment to strengthen your enamel. Avoiding overly hot or cold foods and drinks during treatment can provide additional relief. With proper care and management, you can minimize tooth sensitivity and continue your whitening treatment comfortably. Talking to your dentist about any sensitivity concerns will help you tailor a plan.
Cost of Whitening Trays
The cost of whitening trays varies depending on whether you opt for professional or over-the-counter options. Professional custom trays typically cost more due to the dentist’s expertise and the lab fabrication. OTC trays are generally more affordable. Additional factors influencing the cost include the brand of the whitening product. The length of the treatment, and the specific dental services included. Comparing prices from different providers helps you find the best value. While cost is a factor, consider the long-term benefits, effectiveness, and overall experience when making your decision. Discussing the cost and payment options with your dentist helps you to make an informed financial choice.
Where to Buy Whitening Trays
Whitening trays are available through several channels, offering various choices to consumers. Professional custom trays are exclusively available through dentists. Over-the-counter whitening trays can be purchased at most drugstores, pharmacies, and online retailers. When buying OTC trays, always check the product’s reviews and ingredients to ensure safety and effectiveness. For professional trays, you will need to schedule a consultation with your dentist to have an impression taken. The convenience of purchasing OTC trays is attractive to many. Ensure you consult with a dental professional before starting any whitening treatment. They can evaluate your oral health and provide personalized advice.
Whitening Tray Aftercare
Aftercare is essential for maximizing and maintaining the results from whitening trays. Avoid foods and drinks that can stain your teeth, such as coffee, tea, red wine, and dark-colored berries. Brush your teeth at least twice a day. Use a whitening toothpaste to further enhance and maintain brightness. Floss daily to remove plaque and prevent new stains from forming. Schedule regular dental check-ups and cleanings to monitor your oral health and address any potential issues. Your dentist can provide advice on maintaining your newly whitened smile. By following a consistent aftercare routine, you can enjoy a brighter smile for an extended period.