What is Teeth Whitening in Photoshop?
Teeth whitening in Photoshop is a digital technique used to enhance the appearance of teeth in photographs, making them appear brighter and whiter. This is a common practice in the photography and digital art worlds, often used to correct imperfections, enhance portraits, and improve the overall aesthetic of an image. By manipulating colors, tones, and textures within the image, Photoshop allows users to subtly or dramatically alter the appearance of teeth, providing a more polished and appealing final result. It’s a valuable skill for photographers, retouchers, and anyone seeking to improve the visual impact of their photos online. Whether for personal use or professional applications, understanding how to whiten teeth in Photoshop can significantly elevate the quality of images. It is important to note that while digital enhancement can improve the look of teeth in photos, it is not a substitute for professional dental care.
Benefits of Using Photoshop for Teeth Whitening
The advantages of teeth whitening in Photoshop are numerous, making it a staple in the digital image editing world. First and foremost, it offers a way to achieve a perfect smile without the cost and time commitment of professional dental procedures. It’s a non-invasive, immediate solution, ideal for photos where a bright, white smile is essential. Furthermore, Photoshop allows for precise control and customization. Users can fine-tune the degree of whitening, ensuring a natural look that complements the individual’s features. This level of control is often unachievable with other methods. It also allows for consistency across multiple images, ensuring a cohesive and polished appearance in a set of photos, such as those used on a website or social media profiles. The software allows for the correction of yellowing or staining caused by coffee, tea, or other factors. Finally, with the use of Photoshop, the editing process can be done quickly and efficiently.
Understanding Photoshop Tools for Teeth Whitening

Mastering teeth whitening in Photoshop requires a solid understanding of the various tools and techniques available within the software. Some of the most important tools include the Clone Stamp Tool, which allows users to copy pixels from one area of an image and apply them to another, ideal for covering up stains or imperfections. The Healing Brush Tool is another useful tool which blends the cloned pixels with the surrounding pixels, resulting in a more natural finish. Adjustment Layers are an indispensable feature, offering non-destructive editing capabilities; this allows users to adjust brightness, contrast, and color without altering the original image. These layers can be edited, deleted, and adjusted at any time, providing flexibility and preventing permanent damage to the photo. Also crucial are tools to modify color and tone, like Brightness/Contrast, Hue/Saturation, and Selective Color, which fine-tune the color of the teeth to achieve the desired whitening effect. By becoming familiar with these core tools, users can approach the teeth whitening process with greater confidence and precision.
The Clone Stamp Tool
The Clone Stamp Tool in Photoshop is a versatile tool primarily used to remove blemishes, imperfections, or unwanted elements in an image by copying and pasting pixels from one area to another. For teeth whitening, this tool can be used to address minor stains or discolorations on the teeth. Users can select a clean area of a tooth and clone it over the stained area, effectively eliminating the imperfection. To use the Clone Stamp Tool effectively, it is essential to sample the correct area of the tooth, ensuring the clone blends seamlessly with the surrounding pixels. The tool’s opacity and hardness settings are crucial in controlling the blending effect; adjusting these settings to suit the specific needs of the image can produce the most realistic results. The clone stamp tool is a critical tool for achieving a natural-looking teeth whitening result.
The Healing Brush Tool
The Healing Brush Tool is a powerful feature in Photoshop used for more sophisticated retouching tasks. Unlike the Clone Stamp Tool, the Healing Brush blends the cloned pixels with the target area, integrating the texture and color of the surrounding pixels to create a more natural effect. This is especially useful for teeth whitening, as it allows for the subtle removal of imperfections while retaining the texture of the teeth. In the context of teeth whitening, the Healing Brush can delicately smooth out minor stains or discolorations while maintaining the natural look of the teeth. The Healing Brush Tool offers an automated way to match colors and tones of the source pixels with the destination pixels, thus helping to blend the edited area seamlessly with its surroundings. Adjusting the tool’s settings, such as the brush size and hardness, can ensure that the whitening effect is both precise and authentic.
The Adjustment Layers
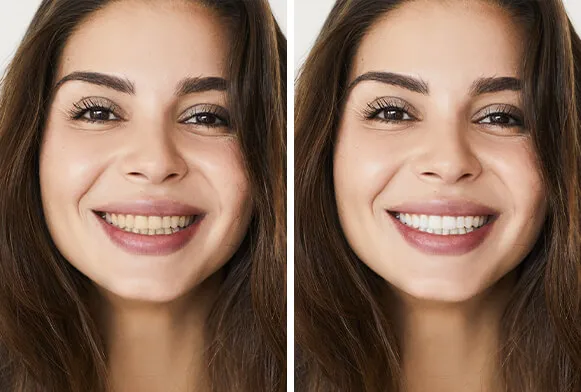
Adjustment Layers are a non-destructive editing feature in Photoshop that allows users to apply changes to an image without permanently altering the original pixels. These layers are independent and can be edited or removed at any time. For teeth whitening, Adjustment Layers are incredibly valuable. Adjustment layers are very useful for modifying the color and tone of the teeth, such as Brightness/Contrast, Hue/Saturation, and Color Balance, giving users precise control over the whitening process. Each adjustment can be customized, allowing for subtle changes that result in a natural-looking outcome. The use of Adjustment Layers is a best practice in digital retouching, as it minimizes the risk of irreversible damage to the photo and allows users to experiment with different techniques and settings. It is an important part of the workflow, allowing you to maintain a high degree of control.
Brightness and Contrast Adjustment
Brightness and Contrast adjustments are fundamental techniques in Photoshop for improving the overall appearance of an image. They help to fine-tune the lightness and darkness of an image, creating a more balanced look. In teeth whitening, these adjustments are important for brightening the teeth and increasing their contrast against the surrounding areas. Brightness adjustment increases or decreases the overall lightness of the teeth, while contrast enhances the difference between light and dark tones, making the teeth appear whiter. Using the Adjustment Layer for this operation is especially beneficial, since it provides non-destructive editing. Precise adjustments can enhance the brilliance of the teeth without affecting the rest of the image. To achieve natural-looking results, it’s essential to make small adjustments and monitor the overall impact on the image. Overdoing these adjustments can result in an unnatural look.
Hue and Saturation Adjustment
The Hue and Saturation adjustment is an essential tool in Photoshop for manipulating the color of an image. The Hue slider controls the color itself, allowing users to shift from one color to another, while the Saturation slider adjusts the intensity or purity of the color. In teeth whitening, the Hue and Saturation adjustments are used to remove or reduce the yellow tones often present in teeth. By slightly shifting the hue towards a lighter color and decreasing the saturation, users can achieve a whiter appearance. Precise control is critical; even small changes can make a large difference, ensuring that the teeth look natural and bright. The adjustment should always be done carefully, so the teeth do not appear too blue or gray. Using these tools in combination with other techniques produces a professional and realistic result.
Selective Color Adjustment
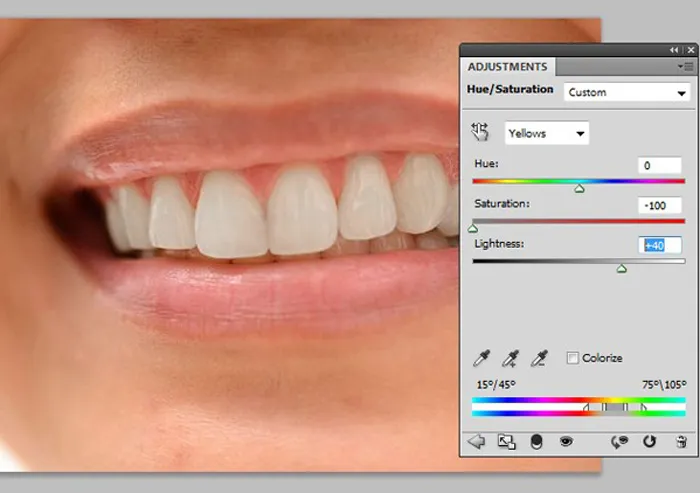
Selective Color is a powerful feature in Photoshop that allows for the precise adjustment of individual colors within an image. It offers advanced control, enabling users to modify the hues, saturation, and luminosity of specific colors without affecting others. In teeth whitening, Selective Color can be used to target the yellow tones in teeth, subtly reducing them to achieve a whiter appearance. It allows for fine-tuning adjustments. By selecting the ‘Yellows’ or ‘Reds’ color range, users can make specific changes that whiten the teeth. Careful use is essential to avoid an unnatural effect. Selective Color enables users to achieve a polished, professional finish in their teeth whitening efforts, helping to create a more attractive image.
10 Easy Photoshop Tricks for Teeth Whitening Online
Trick 1 Quick Selection Tool
The Quick Selection Tool provides a fast and efficient method for selecting the teeth, which is the first step in the teeth whitening process. With a simple click and drag motion over the teeth, the tool automatically identifies and selects the edges, making it easy to isolate the area that needs adjustment. It’s especially effective for photographs with good contrast, where the teeth are clearly separated from the surrounding areas. The Quick Selection Tool’s versatility allows users to add or subtract parts of the selection, allowing for fine-tuning. Once the teeth have been accurately selected, users can apply the whitening techniques, ensuring only the teeth are affected, while the rest of the image remains unchanged. This method streamlines the workflow.
Trick 2 Refining the Selection
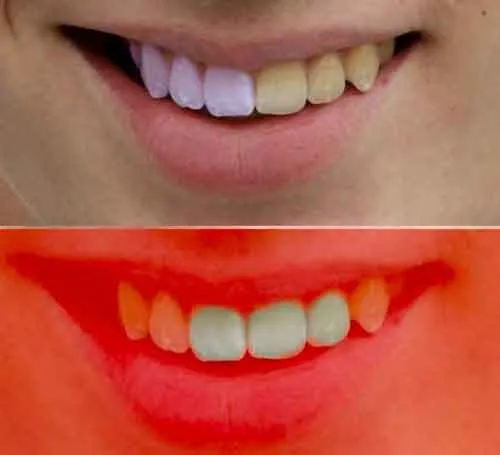
After using the Quick Selection Tool to make the initial selection of the teeth, the next step is often refining that selection for optimal results. Photoshop provides several tools to help in this process, particularly the ‘Select and Mask’ feature. This tool offers advanced options, such as edge detection and feathering, to smooth and refine the edges of the selection. Users can use the tools to adjust the edge radius, and soften the edges of the selection, allowing for a more natural blending. Furthermore, the feature allows for adjustments to the selection’s smoothness and contrast, which ensure that no harsh lines are present. Refine the selection to make the editing process more accurate, helping to create a convincing result.
Trick 3 Applying a Soft Brush
Applying a soft brush is one of the simplest methods to whiten teeth in Photoshop. The tool allows you to gently lighten areas, giving you control over the whitening process. With the teeth selected, choose a soft-edged brush and adjust the opacity to a low setting, such as 10-20%, to avoid an overwhelming effect. You can then softly brush over the teeth, layer by layer, until the desired brightness is achieved. Using a soft brush creates a gradual change that looks more natural. It’s essential to use small, controlled strokes and continually assess the image to avoid over-whitening, which can lead to unrealistic results. This approach is especially useful for beginners or when quick adjustments are needed.
Trick 4 Using Adjustment Layers
As mentioned before, utilizing Adjustment Layers is a best practice in Photoshop. They provide non-destructive editing options, allowing users to experiment with settings without permanently altering the original image. To whiten teeth, create an Adjustment Layer, such as Brightness/Contrast or Hue/Saturation, and clip it to the layer with the teeth selection. This confines the adjustments to only the teeth. Modify the settings to lighten the teeth or correct the color. Using Adjustment Layers offers flexibility. Because each adjustment is independent and can be adjusted or removed at any time, it ensures a more professional and controlled workflow. Adjustment Layers can save you from having to redo all your changes.
Trick 5 Brightness/Contrast Adjustment
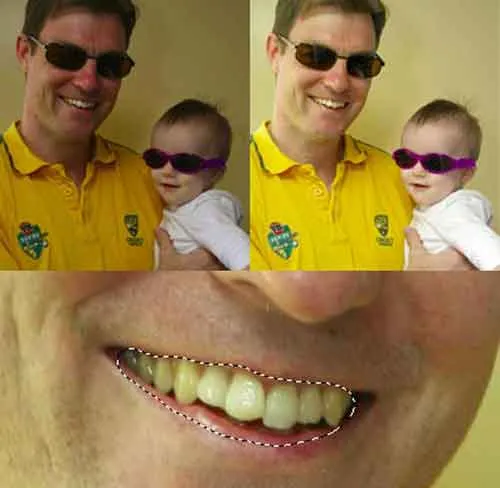
Brightness/Contrast adjustment is a direct and simple technique to whiten teeth in Photoshop. After selecting the teeth, create a Brightness/Contrast Adjustment Layer. Increase the Brightness slightly to lighten the teeth, and adjust the Contrast to enhance the difference between light and dark tones. Using the Brightness/Contrast adjustment, use the sliders to tweak the levels. However, it is important to avoid overdoing it, as it can lead to an unnatural look. A slight adjustment to increase the brightness, and a slight boost to the contrast, will often suffice. This trick is quick and effective, and provides the user with an immediate result that can be easily refined.
Trick 6 Hue/Saturation Adjustment
The Hue/Saturation adjustment is crucial for removing yellow tones from teeth. After making the selection, apply a Hue/Saturation Adjustment Layer. Reduce the Saturation to decrease the intensity of the yellow color, and you can subtly shift the Hue to the left to create whiter teeth. Be careful, as you will want to make slight adjustments to achieve a natural look. Watch out for the changes on the teeth and other parts of the image. This method is very effective and delivers remarkable results. The Hue/Saturation tool gives more control over the colors, allowing you to eliminate the undesired discoloration.
Trick 7 Color Balance
Color Balance is a powerful tool in Photoshop that allows for fine-tuning the color in highlights, mid-tones, and shadows. To whiten teeth with Color Balance, select the teeth and create a Color Balance Adjustment Layer. Use the sliders to subtly shift the colors, by adjusting the mid-tones, highlights, and shadows to remove any yellow or warm tones. Using this trick you can fine-tune and achieve a balanced and natural-looking whitening effect. Careful application is key to ensure the results are natural.
Trick 8 Sharpening the Teeth
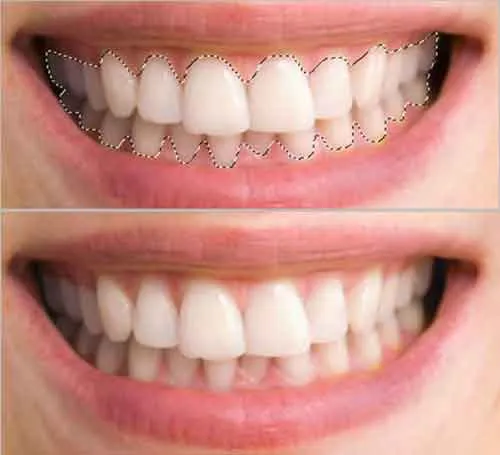
Sharpening the teeth after whitening can enhance the overall look, making them appear more defined and visually appealing. After the whitening adjustments, create a new layer or use a Smart Filter to apply a sharpening filter. Select the area on the teeth, and apply a small amount of sharpening to add detail. Watch out not to overdo it to avoid creating harsh and unnatural lines. By sharpening the teeth, it will add detail and give them a healthy and polished appearance. It’s important to use sharpening sparingly to avoid any unwanted artifacts or a fake look, which makes the result more appealing.
Trick 9 Dodging and Burning
Dodging and Burning are classic retouching techniques that can greatly enhance the quality of teeth whitening. Dodging involves lightening specific areas, while burning darkens them. Create a new layer, and set the blending mode to ‘Overlay’ or ‘Soft Light.’ Select the brush tool with a low opacity and a soft edge, and then use a light color to dodge (lighten) areas that are in shadow. Then use a dark color to burn (darken) areas that are too bright. By carefully adjusting the highlights and shadows, you can give the teeth more dimension and make the whitening effect more realistic. Dodging and burning can make a big difference in adding detail to your work.
Trick 10 Adding a Final Touch
After applying the main whitening techniques, adding a final touch is essential to perfect the results. This may involve making subtle adjustments to the overall color, contrast, or brightness. Check for any imperfections and fix them. It is important to zoom in on the teeth and inspect for any inconsistencies or artifacts. By taking the extra time to refine your work, you can produce a natural-looking result. It is important to carefully check the entire image and make sure the color matches the surrounding areas. By paying attention to details, it makes the difference between an ordinary and a professional-looking teeth whitening.
Common Mistakes to Avoid
While teeth whitening in Photoshop can deliver impressive results, there are several common mistakes that should be avoided to ensure a natural-looking outcome. One of the most common pitfalls is over-whitening. This results in teeth that appear unnaturally bright, often appearing bluish or too white. Excessive sharpening can create harsh outlines and a fake look. It’s better to use subtle adjustments to avoid a result that is not realistic. Overlooking the importance of selecting and refining the selection is also a common issue. A poorly defined selection can result in uneven whitening effects. Not blending the changes correctly with the surrounding areas can result in harsh lines. To fix these problems, users should pay attention to their work. It’s better to start with smaller adjustments, and keep a balanced approach to the overall effect.
Step-by-Step Guide to Teeth Whitening
Here is a step-by-step guide for online teeth whitening in Photoshop. Start by opening the image and duplicate the layer to keep the original image safe. Next, use the Quick Selection Tool or the Pen Tool to select the teeth. Then, refine the selection using the ‘Select and Mask’ feature, ensuring a smooth edge. Now, create an Adjustment Layer. Select Brightness/Contrast and adjust the settings. After that, use Hue/Saturation to target and reduce the yellow tones. Consider applying a Color Balance Adjustment for further color correction. Then, use the Healing Brush Tool or Clone Stamp Tool to fix any stains. Finally, sharpen the teeth slightly and add a final touch to achieve a natural appearance. Regularly checking your work is very important throughout the process to ensure a natural and beautiful finish.
Tools and Resources for Photoshop Teeth Whitening
Photoshop provides a vast array of tools and resources to help users achieve professional-quality teeth whitening. Some of the most useful tools include the Selection Tools (Quick Selection, Magic Wand, Pen), Adjustment Layers (Brightness/Contrast, Hue/Saturation, Color Balance), the Clone Stamp Tool, and the Healing Brush Tool. Apart from these, there are many online tutorials. There are countless tutorials on YouTube and other platforms, where you can learn a variety of techniques. Photoshop’s documentation also provides guides. By combining the knowledge with practice, you’ll be well on your way to mastering the art of teeth whitening in Photoshop.
Conclusion
Teeth whitening in Photoshop provides a powerful and accessible way to enhance the appearance of smiles in photographs, with many possibilities for creating stunning images. From basic adjustments to more sophisticated techniques, Photoshop enables users to achieve professional results. By mastering the tools and techniques, anyone can correct imperfections and brighten the appearance of teeth, making it a very valuable skill in the digital age. Remember to approach the process with a focus on natural-looking results. This will ensure the most successful outcomes. The key to success is practice and a thorough understanding of the available tools. Digital teeth whitening can be a valuable tool for improving the look of your photos. The techniques discussed will help you on your way to creating beautiful images with brighter smiles. By practicing and following these steps, you will soon be able to create beautiful images.
